Building a Docker image for our production or development could be quite a challenge from various aspects, and one of them is to make the image size small!
When building a Docker image, it could get to the size of 1GB pretty easily, trust me, I’ve done it myself. As we’ve done with each technology we’ve used until now, firstly we need to understand how it works, and by that, leverage its functionality and behavior in order to achieve our goal, which is having small footprint docker images.
As part of a story task I’ve had, I remember laughing with a DevOps colleague that we’ve reached an image of 4G in size. We immediately started thinking about how can one reach that size, and in general if the Dockerfile we’ve made was so bad that we simply installed multiple unnecessary stuff along the way or not.
So what did we do?
We knew that scanning visually the Dockerfile for the commands we were doing is the next crucial step, but also try to understand what is happening inside that flow of building a Docker image out of a Dockerfile. After doing so, we hopefully will reach the goal of the most optimal image!
That process was quite a tedious one, and many friends of mine asked about this topic multiple times, so I thought if they had challenges with it then this blog post will be very useful to other people as well, and that’s why it was written.
Table of Contents
Before We Start
I’m adding here for you a few links to previous posts of mine about Docker in case you would wish to further your reading about Docker technology.
How To Work with Docker – Containers & Images
How to Dockerize an RTC App or Service

Before We Reduce Docker Image Size – What is it?!
Docker images are layers on top of other layers, which in the end, all of them compose together an image we run a container out of. But how do those layers are created?
In a Dockerfile, with each command he has, he creates a layer on top of previous layers. He does this because this allows him to take small parts as a building puzzle, and build the whole picture with the moving parts he has at reach.
Each layer we create is actually re-usable in other docker images that we will build on the same machine, but also it’s used for caching and tracking the changes so the build process would be more efficient, and also, in the end, allow us to save space because of the layers re-usability, but then again, use them for re-using functioning layers that we wish to re-use of previous working Docker images.
Also, when we download an image, if it already exists on our machine, those already existing layers wouldn’t be downloaded again but will be using the cached ones, not only making the build process efficient but also the downloading of images.
Tip 1 – Understanding the Layers
When executing a Dockerfile to build an image, give a look at the output and you would see for each command there’s a step. For each step, you would see a container ID which is a temp container created for building a layer. This process is made for each command in our Dockerfile.
Some of you might already see the solution which is — “Be a minimalist with the number of commands, Eureka!”
You’re right but there are more challenges that hide from the eye. What about cases we need to transfer huge files into the Dockerfile using the COPY command and afterward we don’t necessarily need them?
It might have dawned on you now, but when we copy a huge file into the image we’re building, that’s only a copy command and as a result, we have a layer with the size of that file which we cannot get rid of.
So what can we do?
The solution is like the best practice of all and it’s simply not to copy huge files into the Docker image. What we can do for those cases, we can to have a RUN command that downloads it for us, use it how it needs it, and afterward delete it.
So for a conclusion for commands and creating layers, we should not create huge layers that are results of artifacts that can be deleted right away after using them, so just having a feel of how to do a run command as such could be something like this:
RUN curl -o https://my-domain.com/some-huge-file.tar \
      && tar -xzvf some-huge-file.tar
      && run-some-installation-script-for-the-huge-file.sh \
      && rm some-huge-file-output-folders \
      && rm some-huge-file.tar
Again, this is only an example but you can see that in a single command, we downloaded what we needed, made our artifacts which could be binaries, configuration files or other stuff, and at the end deleted everything that we didn’t need for production use so the layer of this command stayed as minimal as possible.
Another final aspect of not making huge footprint commands is also thinking about where you can store big files that are used for updating your application, or even having inside many binaries you use for your application installation phase.
This way, you can download them, and easily delete those files afterward without the consideration to have a huge layer for them.
But wait… if layers are that important… isn’t the FROM command as well?
Yes, it is!
Why? Because it’s a base image we’re basing on. If we’re basing our work on another image then shouldn’t we choose the base image wisely?
The answer is of course yes!
There’s an alpine Docker image(link), which is a minimal Docker image that’s based on Alpine Linux. If we use that, we will start from a very minimal size, and then add only the stuff we need, and not have additional stuff already built-in that other images need to have.
But wait there’s a catch!🧐
What if along the way we would need more packages or binaries that don’t exist in our base image? Then some of you might say “OK… so let’s just install them and be done with it” but what about the complexity of adding more packages against using a higher-level image that would be 50–100Mb bigger, but solves a lot of dependencies problems and making DevOps/System work a lot simpler?
Tip 2 – Installing Only Necessary Stuff
When we create our applications, servers, and so on … we install other dependencies in order to achieve the final solution we need. It could be the run time for our application code, like installing JVM, Python, Node.JS, and so on… but it could also be installing OS-wise libraries that we probably will install as well in the Docker image because we need them in our Docker container.
When we install those packages or download additional libraries, we not necessarily will need them afterward, once our application is up and running. Because of that, we can remove all of those dependencies once we’re done with them on each step of our Dockerfile.
In addition, once we install any dependency, the package managers, like apt in ubuntu, usually installing for us additional packages that are recommended, which is being done in order to save time for us to install too many packages and have the headache to match the needed versions and so on …
Therefore, we can also put a flag in our package installations commands to not install all recommended libraries, and install only the specific ones we wish to have, like so:
RUN apt-get update \
    && apt-get upgrade \
    && apt-get install --no-install-recommends python3
Tip 3 – Multi Stage Dockerfile!
As you understood from tip No.3, we don’t necessarily need everything we install to build the end solution for our Docker image. Because of that, Docker understood this as well, and they allowed for having multi-stage builds, which will allow us to take the specific artifacts from his stage and as a result artifact and leave everything else behind.
You might be thinking “Then why we’ve read this article until now?!” This sounds like the ultimate solution!
That’s reasonable but then again, Multi-Stage build allows people who’re starting to work with Docker not to make the mistakes that usually anyone does at the start when experimenting with Dockerfiles like making it 10G memory. In addition, it allows a standard for having the Dockerfile split in a way that will have a logical understanding of the sections we have in it regarding its build process, which is also amazing for the ones who love good organizing.
As we understood earlier, we talked about making a RUN command that will make a layer for its output, or any other command that creates an update for the Docker image.
Imagine now that we can make a step that will do all of this stuff, would not create a layer but will give us artifacts which are the binaries output or other packages needed for further steps of the image-building process.
Wouldn’t it be awesome?
I don’t wish to make this also a Docker multi-stage build post, so I just wanted to leave you with a taste of curiosity for the next post to come 🙃
In order to leave you with an example, let’s see a Dockerfile that can be found on GitHub, and it looks like this:
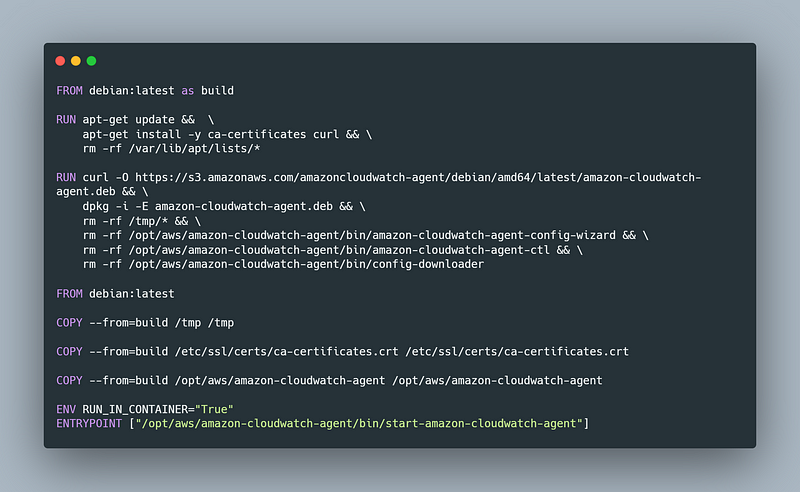
In Amazon, there’s a service called CloudWatch agent. It allows receiving logs from a machine by specifying a path to that log file so that the file could be seen in the User Interface of AWS Console.
Here the example is trying to simply install a few libraries, and also downloading a deb binary that allows installing an Amazon CloudWatch agent.
As you can see from the first part until the line which says “FROM debian:latest” the binaries and data that it allocates for installing the application, wouldn’t be saved to the destination image.
So afterward, when building the new image, we’re accessing the file system on the 1st stage, and copying the data from there to our own wished-to-be-built image.
I think the commands are mostly self-explanatory but the main idea here is that you install or configure any kind of applications at earlier stages, and use the artifacts you’ve created in them later in your final stage.
Alternatively, you could have done more stages for different applications, and relay in each stage to other stages as well.
Final Thoughts
We’ve covered some tips and the first mistakes I personally made when I started to create Docker images, and the reason is that it’s not that straightforward to think about those smallest things and that’s fine because we are learning along the way how to minimize a Docker image.
I hope you had a great time reading this piece, and if you have any further questions I would be delighted to answer them.
Also, if you have any opinions or suggestions for improving this piece, I would like to hear 🙂
Thank you all for your time and I wish you a great journey!
Reference Links
- Docker Multi-Stage Build short tutorial
- Docker Layers Explained
- Post Background Image – Photo by Ella Olsson: Link
